Saturday, March 25, 2017

Axe and Brimstone - Scenario 1 - Raid on Elvenfell

The Possessed Dwarves need souls to sacrifice for their demonic rituals.  There are not many souls as innocent and pure as those of Halflings.  In the village of Elvenfell, the Halflings are suddenly the target of a raid by the Possessed who want to capture as many civilians hiding in their homes as they can.

The Halflings: Hound Rider (Q3+ C3, Heavily Armored, Long Move, Mounted, Powerful Jaws), two Militiamen (Q4+ C2, Block, Heavily Armored), Chieftain (Q3+ C3, Block, Elven Plate Armor, Inspire), two Archers (Q4+ C2, Gang, Good Shot, Short Bow), Holy Man (Q3+ C2, Holy, Spellcaster, Spell: Holy Light, Wall of Holy Light), Trapper (Q3+ C3, Outdoor Specialist, Rare, Snares), and Cook (Q3+ C2, Arcane Cook, Medicine Bag).  For the Cook's magical food he gave Energizing Jam to both Militiamen, Trapper, and Chieftain, and a Cake of Fury to the Hound Rider.

The Possessed:  Hell Hound (Q3+ C4, Danger Sense, Demon, Fear Aura, Long Move), Hellfire Fusilier (Q3+ C2, Hellfire Arquebus, Short Move), Hellchain Fanatic (Q3+ C4, Ball-and-Chain, Opportunistic, Short Move, Steadfast), Heavy Infantry with Paincarver (Q3+ C3, Heavily Armored, Paincarver, Short Move), Screaming Face Axeman (Q3+ C4, Heavily Armored, Short Move, Vorpal Blade), Heavy Infantry (Q3+ C4, Heavily Armored, Short Move), and Hellcaster (Q3+ C2, Short Move, Spellcaster, Spell: Hellfire Ammunition, Hellfire Blast, Hellfire Immolation).

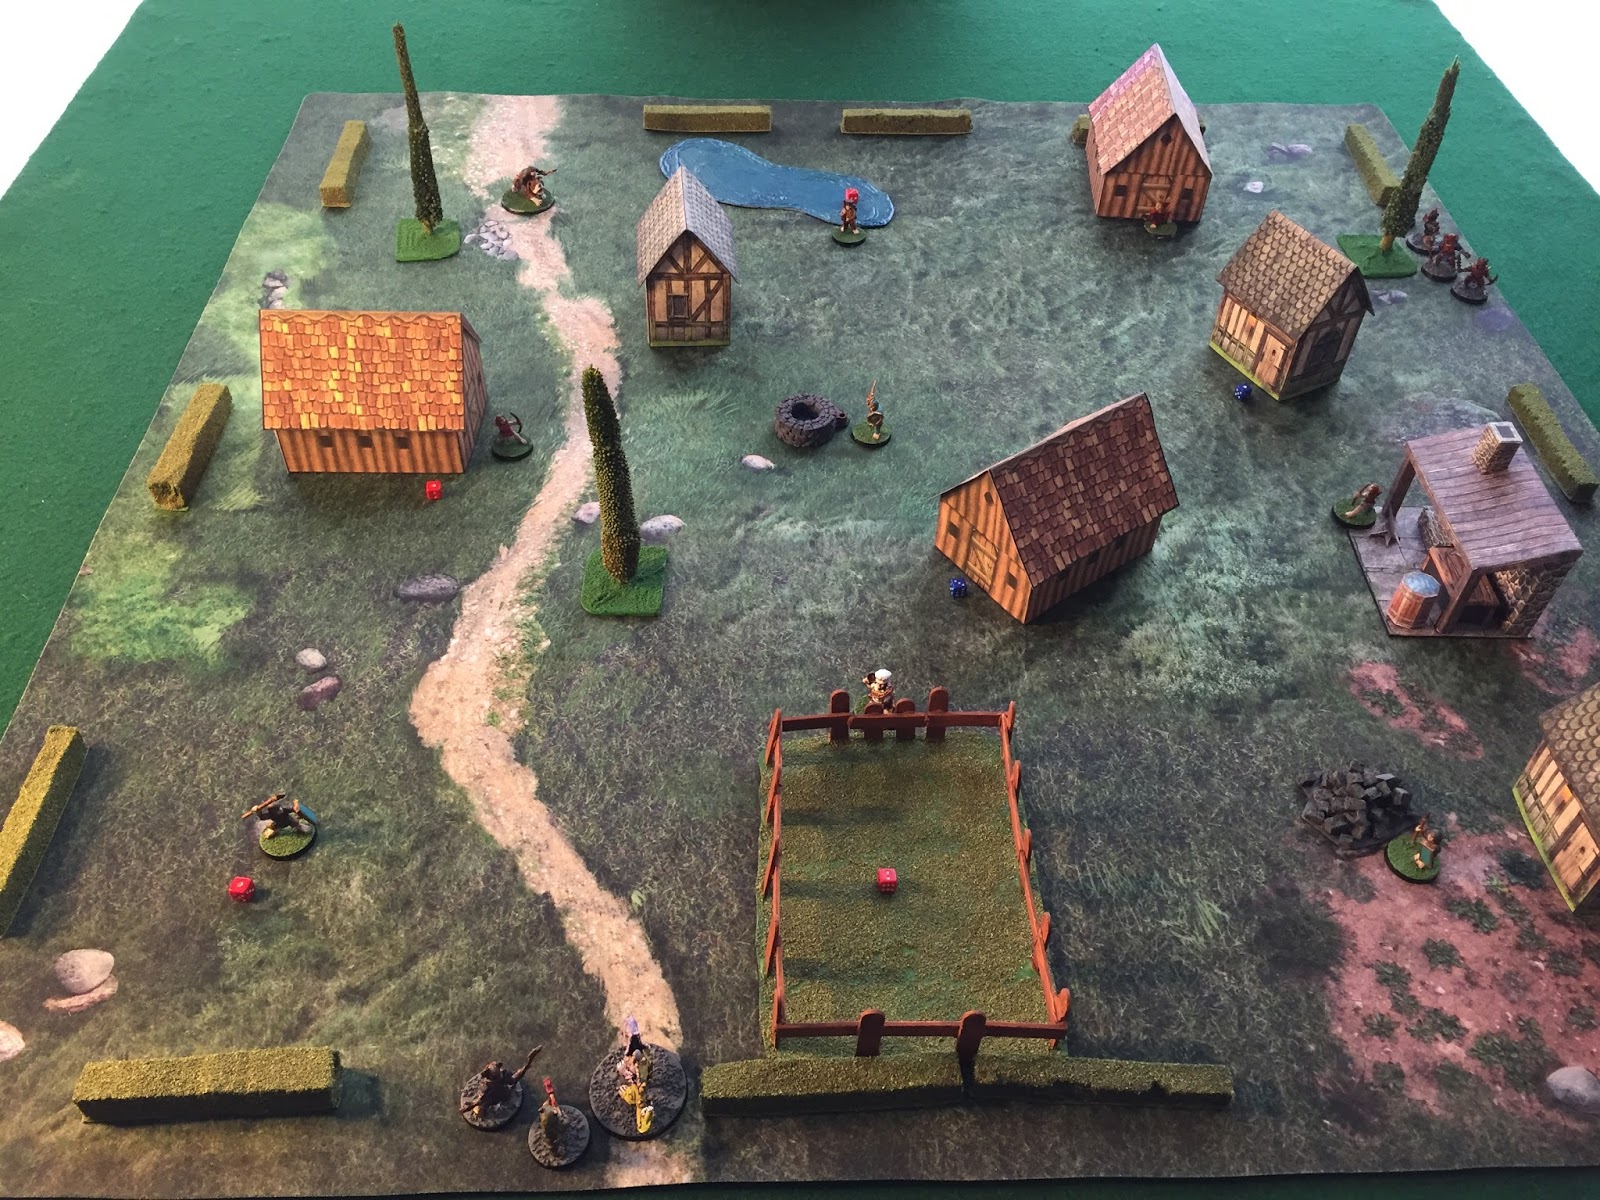
The Halfling village of Elvenfell.  The red dice represent Elven Lures.  The blue dice represent snares from the Halfling Trapper.  There is one Halfling in each of the nine imaginary squares.  The Possessed are split, with one team on the southern road and the other team on the northeast corner.

Here the Hell Hound, Heavy Infantry, and Hellfire Fusilier take the road from the south.

The Hellcaster, Hellchain Fanatic, Screaming Face Axeman, and Heavy Infantry with Paincarver approach from the northeast.

Opening turn, Hell Hound advances.

The Halflings regroup, waiting as the Halfling Hound Rider comes racing down the road.  The Possessed Heavy Infantry reveals an Elven Lure, but the ancient elven song is not enough to transfix the dwarf.

The Halfling Holy Man, realizing he was about to face the brunt of the Possessed raid, summoned a Wall of Holy Light to block the demonic dwarves and enable his Halfling allies to arrive in time.

The Hound Rider and Hell Hound clash as the Heavy Infantry and Fusilier advance.

The Screaming Face Axeman rushes around the Wall of Holy Light to barge into the Trapper and Halfling Chieftain.  Meanwhile, the Hellcaster, Hellchain Fanatic, and Paincarver try to run around the middle house. 
The Hell Hound is slain by the Hound Rider.  Then the Halfling Archer runs forward and fires an arrow to knock down the Fusilier.  The Militiamen advance to block the Heavy Infantry. 
The Holy Man has only one spell to stop the Possessed, thus dropping another Wall of Holy Light in front of the house the dwarves were approaching.  The other Halfling Archer uses her keen short bow in close proximity to make the Hellchain Fanatic fall prone.

The Hound Rider, having neatly killed the Hell Hound, charged the Fusilier.

The Possessed continue to beat at the Wall of Holy Light and the Hellchain Fanatic bounced up to take on the Halfling Archer.  

The Fusilier is slain as the Militiamen and Cook try to swarm the Heavy Infantry.

The Wall of Holy Light was destroyed, but the Holy Man simply summoned another.  The Screaming Face Axeman bowled over both the Trapper and Chieftain.

The Heavy Infantry is slain and the remaining Halflings now rush to the northeast to assist their countrymen.

The Possessed are severely outnumbered, surely this must be the end.

The Chieftain is slain and now the Holy Man is threatened by the Paincarver.  The Hellchain Fanatic now faces more Halfling defenders.

The Holy Man is Gruesomely Killed by the Paincarver.  The Trapper is killed by the Screaming Face Axeman.  One of the Archers ran screaming off into the distance, leaving the village in a panic.

Without the Holy Man, the Wall of Holy Light is extinguished.  The Halfling defenders continue to attack, hoping to turn the tide.

The Hound Rider is Gruesomely Killed by the Hellchain Fanatic.  This panics the other Archer, Cook, and a Militiman, who all run but do not flee the village.

The desperation of the Halflings is palpable.  The Screaming Face Axeman is now battering the door on the house to the north as the Hellcaster tries to shrug off a stubborn Militiaman to get in the middle house.

Doors are hacked down....

Only one Militiaman remains....

The Screaming Face Axeman and Hellcaster make off with one civilian each.

The Militiaman has a lucky strike, tripping the Paincarver.  Will his fortune hold?

The Hellchain Fanatic bashes down another door.

The Paincarver eviscerates the Militiaman.  The other Possessed make off with their hostages.

These are the sole survivors of the scenario.  As there were no Halflings remaining, no one could contest them each getting a civilian off the board.  So the Possessed now have four Halfling sacrifices to be used later.  As well, they gained a Demonic Seal.  The Hellchain Fanatic received the Hellfury Seal.

The Holy Man and Hound Rider were Gruesomely Killed, so they are completely dead.  The lavender dressed Archer will miss the next game.  The pink Archer had fled the village, so she is fine, and so is the Militiaman in the throwing spear pose.  The rest of the Halflings are all at -1 Q next game.  Great rolling for survival guys.

This was a fun scenario.  Its my first time playing with any of the new traits from Axe & Brimstone, so it took a while to wrap my head around all the different stuff that was added.  There was a lot on the table to keep track of when playing solo but overall I think I did all right.  Its nice having a gaming mat and using all my new terrain pieces.

Issues/Thoughts/Opinions:
1)  The scenario includes a LOT of extra tidbits with game mechanics for each terrain feature, which is great.  About the only thing I used out of all the extras were three of the Elven Lures, which all failed to do anything, which is not great but the will of the dice gods.  Pretty much all of the circumstances that need to occur to activate the different terrain mechanics relies on a very slim margin for success.

2)  Holy Man with Holy, Holy Light, and Wall of Holy Light sounds like the perfect bane to evil-doers.  Which it is if the enemy is just demons or undead, but not against Possessed.  My fault for not reading the traits in depth before writing up the profile.  And the Wall of Holy Light, can it be destroyed/attacked like other Wall spells?  I assumed yes.

3)  The Victory Conditions require the Halflings to slay the Possessed and for the Possessed to drag away civilians.  What happens if there are no Halflings remaining?  Do the surviving Possessed each get one civilian or d3 from each house, since no one remains to stop them?

4)  Halfling Food Magic is neat.  The Energizing Jam was awesome as was the Cake of Fury.

5)  Short Bows are wickedly good within 1x Short when coupled with Good Shot.  Highly recommended for close encounters.

6)  I actually got Elven Plate Armor to work after failing a Block.  Dice gods are fickle.

7)  Hellfire Blast - what is its range?  I would assume it should have Variable Range, or be like the Hellfire Arquebus.

Axe and Brimstone

I'm behind on this blog again.  I completely forgot to post my latest arrival.  I got the Axe & Brimstone Kickstarter stuff (https://www.kickstarter.com/projects/9742092/song-of-blades-axe-and-brimstone)!

I didn't join the kickstarter, instead I won a mini contest that Ganesha Games had (https://www.facebook.com/ganeshagamesfantasy/posts/975889432537858?comment_tracking=%7B%22tn%22%3A%22O%22%7D).  And that video is here:  https://www.youtube.com/watch?v=KJaQFo7ZLm8

Anyways, I've already painted the miniatures and played the first scenario, which I will post real shortly.

Here is the campaign book and the beautiful 3'x3' mat.  Great stuff!

The Halflings, with all their quirky characterful sculpts.

The Possessed Dwarves, looking all chaotic and mean.

Friday, February 17, 2017

Double Tap - Grots vs Veer-myn

I had another opportunity to try out One Page Rules' Double Tap, which just got updated to version 1.1  (https://onepagerules.wordpress.com/portfolio/double-tap/)

This time the teams each were about 75 points and I used non-Infinity models.  As well, the battlefield is 4' x 4' with lots of terrain features.  I made up a 'capture and hold' scenario to be played out instead of a straight 'kill'em all' mission.
Left to right:  Skullcap, Ninja, Doc, Pirate, Buckethead, and Patch
The first team is made up of GW Grots.  Skullcap is Quality 3+, has a Pistol and Sword and the Leader ability.  Ninja is Quality 4+, has a Pistol and Sword and the Martial Arts trait.  Doc is Quality 4+, has a Pistol with Fire Rounds and the Doctor trait.  Pirate is Quality 4+, has a Carbine and the Marksman trait.  Buckethead and Patch are both Quality 4+ and have SMGs.  The total points is 75.5.

Left to right:  Progenitor Skitter, Progenitor Skiffe, Nightmare Bonegrinder, Night Crawlers Krikk and Krekk
The second team are Mantic Veer-myn.  Progenitor Skitter is Quality 3+, has a Pistol with Poison and the Leader trait.  Progenitor Skiffe is Quality 4+, has a Sniper Rifle with Poison.  Nightmare Bonegrinder is Quality 4+, has a Sword and Pistol with Poison and the Large and Veteran traits.  Night Crawlers Krikk and Krekk are Quality 4+ and have Pistols with Poison.  Total points are 76.

Pirate takes a commanding position from the second-floor doorway as the others assemble below.

Patch and Ninja are watching the left flank.

Krikk and Krekk are on the Veer-myn left flank.

The Progenitors and Nightmare are on the Veer-myn right.

The three crates are the scenario objectives.
The scenario requires a teams to capture and hold the most objectives by the end of the 4th round.  To capture the objective a unit must be within 2" without any enemy models contesting it.  If no objectives are captured or there is a tie, then the team that has slain the most points in models wins.

Krikk runs to the stairway to the landing pad, trying to keep hidden from sniping Grots.

Skitter advances on the central tower as Bonegrinder goes for the one on their right.

The Grots scamper their way forward.

Things are grim at this point.  Pirate and Skullcap are all that remain of the Grots.

Skiffe has proven how deadly sniping can be from his hidden position.  Bonegrinder is able to take and hold the right objective as Skitter prepares to climb the tower for the center objective.

Pirate is able to take out Progenitor Skitter.

With the last activation of the 4th round, the Grot Pirate guns down Bonegrinder.

With only Skullcap and Pirate remaining of the Grots and Skiffe of the Veer-myn, the Grots are the winners!
Recap:  The Veer-myn were aggressive running to the objectives, relying on the fact that the majority of the Grots had short range weaponry.  But they did not count on a sharpshooter on the Grot team.  Pirate proved to be the star of this game.  As the Night Crawlers ran for the launch pad, Pirate gunned them down.  When Progenitor Skitter tried to cower behind the central tower objective, it was Pirate who killed him.  And when Bonegrinder was the only Veer-myn left on an objective, in the final seconds of the game, it was Pirate who murdered him in a hail of bullet fire and ensured a Grot victory.

Thoughts:  Playing on a 4'x4' battlefield is a challenge when the majority of your units have short range weapons and one team has a sniper rifle.  Although the Grots pulled out a win and that Pirate's Carbine with Marksman proved to be the deciding factor, it was Progenitor Skiffe's Sniper Rifle that kept the Veer-myn unafraid in advancing quickly.  Having a sniper rifle with a commanding view of the field, the reaction shooting of Skiffe took out many Grots and kept the survivors ducked down.

In this case I think it would have been better to reduce the field to 3'x3' in order to clutter in more terrain and break up firing lanes.  There were zero opportunities where either team could get close to being within melee range.  Part of this fault is due to what units were in each team, but I wanted to try something different out to see how Double Tap handles skewed situations.  I'm thinking of other variations of teams to try out next.


Sunday, February 12, 2017

Double Tap - Operation Icestorm - Panoceania vs Nomads

One Page Rules has redesigned itself, sharing some games that look familiar and bringing out one that had disappeared off its roster.  I'm talking about Double Tap:  https://onepagerules.wordpress.com/portfolio/double-tap/

Double Tap is a one page take on Corvus Belli's Infinity.  The core mechanics are the same as when I first tried the game out, but now the designer has added in some special traits and unit creation rules.
Ooh, shiny Operation: Icestorm.

So I pulled out Operation Icestorm, gave stats to the Panoceania and Nomads, and laid out the game mat and terrain like Mission 5: Take R&D.  The primary goal is to take and hold the central rooftop after 4 rounds and secondary goal is to kill enemy units.


The central building is the primary objective.  Panoceania will setup on the left and Nomads to the right.

Panoceania:  Akalis, Nisses, Orc Troop, Father Knight, and 3 Fusiliers.

Panoceania:  Akalis is Quality 4+, has a Carbine and Airborne Deployment.  Nisses is Quality 4+, has a Sniper Rifle, Mimetism (-1 to be shot at, made this one trait up), and Spotter.  Orc Troop is Quality 4+, has a Carbine and Armored.  Father Knight is Quality 3+, has a Knife, Armored, Martial Arts, and Leader.  The three Fusiliers are Quality 4+ and have Carbines.

Nomads:  Reverend Healer, Spektr, Grenzer, Mobile Brigada, and 3 Corregidor Alguaciles.
Nomads:  Reverend Healer is Quality 3+, has a Carbine, Doctor, Leader, and Mimetism (-1 to be shot at, made this one trait up).  Spektr is Quality 4+, has Carbine, Camouflage, and Infiltrate.  Grenzer is Quality 4+, has Sniper Rifle and Spotter.  Mobile Brigada is Quality 4+, has Carbine and Armored.  The three Alguaciles are Quality 4+ and have Carbines.

Here is the Nomads' deployment zone.

Here is the Panoceania's deployment zone.

Here is the Reverend Healer and the Father Knight locked in melee in the 4th round.  Panoceania has one Fusilier on the rooftop and no Nomads to contest it.  The Reverend Healer is the only Nomad in range.

The Reverend Healer is able to Dodge out of melee with the Father Knight and uses the last Activation Point to climb the ladder to the roof and to shoot at the Fusilier.  Unfortunately her shots missed.

Here are the survivors of both teams.  With the building contested, Panoceania still wins with more kills.

The Nomads were the first to get to the building as the Spektr stealthed his way up.  But soon found out the hard way that the sniping Nisses was not fooled by camouflage.  As the game progressed, more units found themselves gunned down as they peaked around corners, trying to make a run for the central building.  In the end; the Father Knight had made his way into the Nomads' side of the board, hacking down the Mobile Brigada and moving into melee with the Reverend Healer.  In a last ditch effort the Reverend Healer dodged out of melee with the Father Knight, climbed a ladder up the building and tried to gun down the lone Fusilier on the rooftop.  But her shots went wild.

The game played out like I thought it would.  Units moved up, trying to stay in cover, taking potshots from around corners and getting shot up along the way as they crossed lanes with enemies in line of sight.  Hugging cover is key to this game as your units WILL get shot at unless you are cowering behind buildings.